Tuesday, September 7, 2010

Creating a quote paragraph style

Another type of paragraph found in academic documents is quote paragraph. It is especially true for social sciences where an author quotes a lot of other works to support his writing. Quote paragraph is not so common in natural sciences. In either case, appropriate and sufficient accreditations have to be given to quoted resources.

If you make a lot of quotation, it is recommended that you make a special paragraph style of its own. This is to differentiate it with your general paragraph that also has its own style. When you have created the quote paragraph style, then you can simply bring your cursor to the quoted paragraph and click its style in Style panel. Thay way you will have a very consistent quote paragraph look.

Creating a quote paragraph style follows steps that used for creating the normal paragraph style. Please see How to Create a General Paragraph as described previously.

Sunday, September 5, 2010

Creating a general paragraph style

What is meant to be a general paragraph style. In your academic documents such as thesis or other research reports, you will have a paragraph style that is the most often used throughout your document. Let us call this as a general paragraph and create a style for it. It is very convenient to create a general paragraph style to change the appearance of your paragraph and not directly change the paragraph texts from within the text area.

Before you do creating a general paragraph style, please check your academic writing guideline (if you have one) on how a particular paragraph should be produced. See, for example, whether the first line of each paragraph should be indented for how much or not need to be indented, spacing of each line within that paragraph, etc. Below we will try to generate a general paragraph which is a common style to a graduate thesis. Once you understand how to do this, you can adjust the style according to your particular needs.
  1. Open your Academic Document
  2. Put your cursor anywhere in your document where you want to put the paragraph; here is under Background sub chapter
  3. In the Style panel click New Style (at the bottom left of the panel)
  4. In the appearing window, give a name for that new style such as General Paragraph
  5. Click Format and then Paragraph to modify the paragraph style of that General Paragraph. As an example, here we use Justified for Allignment, First line by 1 cm for Special Indentation, and 1.5 lines for Line spacing. You can leave other attributes as such.
  6. Click OK
  7. Click OK once more.
  8. Save your Academic Document
Now the General Paragraph style is on the Style panel. Try to type text now with the General Paragraph style. You can compare that by typing another text with Normal style. See the following image from your Academic Document.

How to create your thesis with Word 2007 and 2010: Step 8 - Separate Chapters with Section Break

So far we have learned through several steps on how to create your thesis or similar structured documents with Word 2007 or 2010. In the last steps (Step 7 - How to give number to your chapters and sub-chapters) we have applied multilevel list numbering to chapter and sub chapter headings. In that step we have produced Academic Document 3 that has been given a structure according to that used by many academic documents. Academic Document 3 has Heading 1, Heading 2, and Heading 3. If you want to expand further by adding more headings, for example Heading 4, 5 and soon, it is so simple to do if you apply the principles described in previous posts.

However, our Academic Document 3 is still in one single page or two, and we need to organise it into many sections appropriately so that each section is for a different chapter. The feature we are going to use here is Section Break. Section break gives you a full control over each section of your document. You can, for example, give a page footer to a particular section which differ to another.

To apply section break to each chapter, follow below steps:
  1. Open your Academic Document 3
  2. Bring your cursor to position just before the name for Chapter 1 (that is in the case of Academic Document, it is between Chapter 1 and Introduction). Please make sure to put your cursor correctly, otherwise you may cut the chapter name).
  3. Under Page Layout menu, click Breaks and then Next Page
  4. Repeat these steps for the other chapters
  5. Save your Academic Document 3 into Academic Document 4.
By now, each chapter has been separated with a section break. You can see the section break mark by activating the paragraph mark (under Home menu).


    Inserting more tables and updating list of tables accordingly

    When you create your tables and caption them using the Caption facility provided by Microsoft Word, the table names will numbered authomatically. You can then create your List of Tables more conveniently. You can always do this during your academic documents writing, without a need to await until it has been finished.

    What happen if you insert a table in middle section? For exampe, you have created a 70 pages document with many orderly numbered tables already in it. If you insert a new table in earlier pages, than the Caption facility will redo autonumbering of your tables. So, your tables will always be correctly auto numbered.

    No that so with your List of Tables. It does not change automatically as you include new tables. You have to update it to include the added tables names and pages. Here is how to do it:
    1. Go to your old List of Tables, and right click anywhere in that List of Tables
    2. Click Update Field
    3. Click Update entire table in appearing window
    4. Click OK.

    Saturday, September 4, 2010

    How to create your thesis with Word 2007 and 2010: Step 7 - Heading Numbering in Microsoft Word 2007 or 2010

    Before we go to any details about heading numbering in Microsoft Word 2007 or 2010, let me tell first that in previous posts we have learned how to apply Heading styles for chapters in Microsoft Word 2007 or 2010 and how to modify them. We first learn from scratch in the process of Creating Thesis with Word 2007 or 2010 on how to use default Heading Styles (Step 4), How to Modify Heading 1 (Step 5), and then How to Modify Heading 2 and 3 (Heading 6). Resulting from these learning steps, we have created Microsoft Word 2007 documents (editable in Word 2010) called Academic Document which we re-saved to Academic Document 1 and then to Academic Document 2. I recommend you to download all of these documents for you to easily understand the process.

    Now in this post we will learn how to give number to Heading or to chapters. This is very important in academic documents creation. There are still lots of people who have not found how to do this in the best way.
    1. Open the Academic Document 2
    2. While your mouse cursor is on Introduction and Heading 1 in Style panel is being selected, click Multilevel List on Paragraph ribbon (under Home menu). See this below
    3. Select the multilevel list indicated in the image from List Library
    4. After that, select Define New Multilevel List to bring up its window
    5. Click More tab to expand the window, and you can see all attributes for Heading 1 style and its numbering.
    For now, leave it as such for Heading 1

    Numbering Heading 2
    1. Move to select number 2 under Click level to modify:
    2. For Include level number from: select Level 1
    3. Put a dot after the first number 1 appearing in the box of Enter formatting for number:
    4. Then select 1, 2, 3, ... for Number style for this level: box
    5. Set 1 cm for Text indent at:
    6. For Follow number with:, select Tab character
    7. Select radio button of Stop tab at: and the put 1 in the box.

    Numbering Heading 3
    1. Move to select number 3 under Click level to modify:
    2. For Include level number from: select Level 1
    3. Put a dot after the first number 1 appearing in the box of Enter formatting for number: 
    4. For Include level number from: select Level 2 
    5. Put another dot after the second number 1 appearing in the box of Enter formatting for number: 
    6. Then select 1, 2, 3, ... for Number style for this level: box
    7. Set 1.5 cm for Text indent at:
    8. For Follow number with:, select Tab character
    9. Select radio button of Stop tab at: and the put 1.5 in the box.
    10. Click OK
    Your Academic Document now will have the following appearance. Save your Academic Document 2 into a new name called Academic Document 3.


      How to create your thesis with Word 2007 and 2010: Step 6 - How to Modify Heading 2 and 3 in Word 2007 or 2010

      In a previous post entitled How to Create Chapter Heading (Step 4 of How to Create a Thesis with Word 2007 or 2010), we have learned how to apply default Heading styles available in Microsoft Word 2007 or 2010. And we have created Academic Document, a Word 2007 or 2010 document showing the result of the process of using the default Heading Style. Because the default Heading styles are unlikely to be applied as such in most academic documents, we then have learned How to Modify Heading 1 (Step 5 of How to Create a Thesis with Word 2007 or 2010) and we re-saved the Academic Document with a new document called Academic Document 1.


      As our learning process continues, we will now learn how to modify Heading 2 and 3.
      1. Open your Academic Document 1
      2. Position your mouse cursor on text applying Heading 2 such as Background, Research Objective, etc. and modify Heading 2 style through Style panel. Go back to previous post in which it was explained how to modify Heading 1.
      3. In the Modify style, select Automatic for font color and select Automatic update
      4. For Paragraph (click Format button to find it), set Auto for Before and 12 for After (both are under Spacing)
      5. Click OK
      6. Once more, OK. For Heading 3, following the above steps for Heading 2, except that it set to font size 12 pt which is 1 point smaller that 13 pt set for Heading 2.
      7. Save your document with a new name called Academic Document 2.

      How to create your thesis with Word 2007 and 2010: Step 5 - How to Modify Chapter Heading 1

      In the previous post on How to create chapter heading (Step 4 in Creating Your Thesis with Word 2007 or 2010), we have learned how to apply Heading styles to major chapters most likely found in your thesis or other academic documents. This includes Introduction, Literature Reviews, and soon. We have created a document called Academic Document as a learning tools. But, so fa we have applied Heading styles that are provided by default in Microsoft Word 2007 or 2010. It is unlikely that academic documents such thesis or research reports will use those default Heading styles as such.

      So how to modify them?

      Now in this post will learn how to customize the default Heading styles. We will now start with Heading 1:
      1. Open your document called Academic Document that we have created before in the previous post. If you have not downloaded it yet, you can do so now.
      2. Bring your mouse cursor to either Introduction, Literature Reviews, Materials and Methods, Result and Discussion, or Conclusion. All these have been associated with Heading 1 style.
      3. In Style panel, you can see that Heading 1 is selected (sorrounded by a box) meaning that your text is currently having been associated Heading 1 style. Click the small arrow on the right of that sorrounding box and then click Modify to bring up Modify style window
      4. Under Formatting, select Automatic for font color
      5. Bring to center by clicking its icon
      6. Select Automatic update
      7. Click OK to see how it looks.
      Modifying Heading 1 paragraph
        1. Click Format button and the Paragraph to bring up the window as seen on the right.
        2. For Spacing, select 0 pt for Before and 24 pt for After
        3. Click OK.
        4. Save your modified document with a named, let us call it Academic Document 1.
        You can modify Heading 2 and 3 in the same way as above steps. But, we have another post explaining about this.

        You can download the Academic Document 1 I created myself.

        How to create your thesis with Word 2007 and 2010: Step 4 - How to Create Your Thesis Chapter Heading

        We will now start learning how to create a thesis with Word 2007 or 2010. This post will tell how you to create your chapter names using Heading facility provided by Microsoft Word 2007 or 2010. For this time, we will use the default Heading style available in Microsoft Office Word 2007 or 2010.

        With the Heading style applied to all chapters, your chapter will look very consistent throughout the document. Also, the use of Heading will help you much in the creation of your academic documents because you can easily create a Table of Contents later with only a few clicks.
        1. Now open a blank, new document in your Microsoft Word 2007 or 2010
        2. Type in the names of your chapters, one line each. You do not need to type 'Chapter' because this will be done via the Heading style modification. Just type in the name, for example Introduction, Literature Reviews, Materials and Methods, Result and Discussion, and Conclusion such as in the following
        3. Expand Style panel by clcking the small arrow on the bottom right corner of Style ribbon (under Home menu)
        4. You can see some styles in that dropped down panel by default, including Heading 1 and Heading 2. Bring your cursor to each one of the above texts, and on the Style panel click Heading 1 until all the texts have appearances according to attributes of Heading 1 style.You can also do this by first selecting all the texts and then click the Heading 1.
        5. Now type in sub chapters under each of the main chapters.
        6. Like for Heading 1, select all the sub chapters under each chapter and then click Heading 2. You document will now have a structure and formatting similar to the following with default styles of Heading 1 and 2.
        7. If you type more texts as sub sub-chapters under each of the sub chapters and then apply Heading 3 for them, you will have something like in the following image.
        8. Now save your document and give a name as Academic Document. We will need this document in next tutorials.
        The Academic document  is the learning tools that is used throughout the process of learning how to create academic documents.  I recommend you to follow all the above steps in the creation of Academic Document, and save it yourself to local computer. Following the above steps yourself allows you to have a feeling about all the process involved. But, I have also created the Academic Document myself and store it in Google Doc. You can go to Google Doc to preview the Academic Documents and download it.

          Introduction to use of Heading styles

          Academic documents such as thesis, dissertation, research reports, research proposal, etc. are organised into chapters, sub-chapters, and sub sub-chapters. The best way to create names of chapters, sub chapters and sub sub-chapters for your documents is to use Heading styles provided by Microsoft Word. In Microsoft Word 2007, you can see Heading style as well as other styles under Home menu and Style ribbon. By clicking the small arrow on the bottom right corner of the Style ribbon, you will have the Style panel ropped down.

          When you open a new document and type text into it, the text will have a normal style. It means that the text will have an apperance according to the style and formatting set to the normal style. When you bring your cursor to the text and then click Heading 1 in Style panel, the text now will have a style and formatting associated with Heading 1. To change the appearance of that text, it is recommended to do it by changing the attributes of the Style being used for that text. You do it from the Style panel. It is not recommended to change appearance of a text directly on text area of the document since it will only affect that particular text. Changing the appearance of texts by modifying styles associated with them will affect all the texts with that style throughout your document.

          Friday, September 3, 2010

          How to create a List of Tables

          A List of Tables is created using Insert Table of Figures (part of Caption ribbon) under Reference menu. This list is placed under a title of List of Tables and is a part of front pages. When you create a List of Table using the Insert Table of Figure, the list is produced by extracting whatever you put when you created your table name using Caption. It will include page numbers and have a consistent look:

          Here is how to insert a List of Tables
          1. Position your cursor where you want put the List of Tables;
          2. Under Reference menu, click Insert Table of Figure and the following box will appear:
          3. In the appearing Table of Figures windows, select Table in Caption Label: box and unselect the radio buttton next to use hyperlink instead of page numbers to show page numbers (not links)
          4. Click OK to see your List of Tables.
          Modifying your List of Tables

          In the example of List of Tables above, you can see that the list may need modifying. On the left you can see the the second line of a table name is positioned without indentation, and you may want to change this so that every additional line for a table name would be indented and moved to right position, in the same position as the first capital of the first line (see marks on the ruler). Also on right you can see right tab is in the same position with right margin which is not good and needs to be modified.
          1. To modify the look of your List of Tables, click the small arrow on the right of Table of Figures in Style panel to see Modify button and click that to bring its window;
          2. Click Format and Paragraph to modify it;
          3. Set Indentation Right by 1 cm and then for Special, select Hanging and By 1.7 cm

          Your List of Tables now looks like below (notice changes at the ruler)

          How to use Caption for your tables

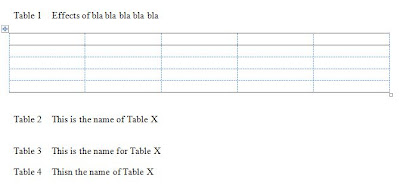
          CWhen you create a table in your academic documents, you will give that table a name which is usually positioned above the table. Table names should have consistent formattings and stylings throughout the document, and it is done with caption facility provided by Word. Not only will the caption give your tables a consistent look, but it will also enable you to later create a List of Tables with only a few clicks.

          Here is how to use Caption
          1. Type in your table name which is in academic documents placed above the table;
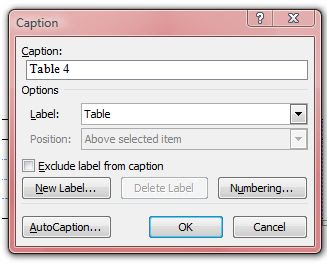
          2. Under Reference menu, you can see Caption ribbon. Click Insert Ribbon to bring up the Caption box; 
          3. In Label: box, select Table. If you are creating your document in non-English language you need to new label by clicking New Label, unless you have created it before and listed already in the Label: box. In the appearing box, type the new label and click OK;
          4. If you want to include chapter number like to have a format like this Table 1-1, then you need to clcik Numbering and select Include chapter number. There you can select also what seperator to use. To include, chapter number, however, in Caption you need to have your chapter formatted to use Heading style.
          5. Click OK and you something like below:

          Modifying Caption

          You can modify the appearance of table names by modifying Caption attributes
          1. Under Reference menu, expand the Style by clicking the small arrow in Style ribbon. This will drop down the Style panel;
          2. Position your cursor on one of the table names you have created and you can see the Caption in the Style panel is selected (sorrounded by a blue box). Click the small arrow on the right of that box and click modify.

          In the appearing window, you can change many attributes of the Caption. You can click Format to see all attributes you can change. The most important ones are Paragraph and Tab. You can change the Paragraph for example to adjust distance of the Caption from its table, while with Tab you can adjust position of label relative to its Caption.

          Share

          Twitter Delicious Facebook Digg Stumbleupon Favorites More